引出声明周期
在组件挂载(mount)完毕后接着开启定时器, 在卸载(unmount)定时器后, 接着取消定时器. 就需要用到两个 react 自己的函数: componentDidMount() 和 componentWillUnmount().
以上两个函数成为生命周期回调函数, 也叫生命周期钩子函数, 也叫生命周期钩子, 也叫生命周期函数.
//1.创建组件
class Life extends React.Component {
   state = {
      opacity:1
   }
   death = () => {
      //利用点击事件清空定时器
      clearInterval(this.timer)
      //写在组建
      ReactDOM.unmountComponentAtNode(document.getElementById("test"))
   }
   //组件刚挂在完毕
   componentDidMount(){
      this.timer = setInterval(() => {
         let {opacity} = this.state;
         opacity -= 0.1;
         if(opacity<=0) opacity = 1
         this.setState({opacity});// key 与 value 重名, 可以简写
      },200)
   }
   //组件将要卸载
   componentWillUnmount(){
      clearInterval(this.timer)
   }
   render() {
      //定时器放在 render 里面, 更新状态的话会引发无限递归. 所以引出 componentDidMount
      return (
         <div>
            <h2 style={{opacity:this.state.opacity}}>React 学不会怎么办?</h2>
            <button onClick={this.death}>不活了</button>
         </div>

      )
   }
}
//2.渲染组件
ReactDOM.render(<Life />, document.getElementById('test'))
理解
- 组件对象从创建到死亡会经历特定阶段.
- React 组件对象包含一系列钩子函数, 在特定时期调用.
- 在定义组件时, 在钩子函数中, 可以书写特定的工作.
旧版本生命周期

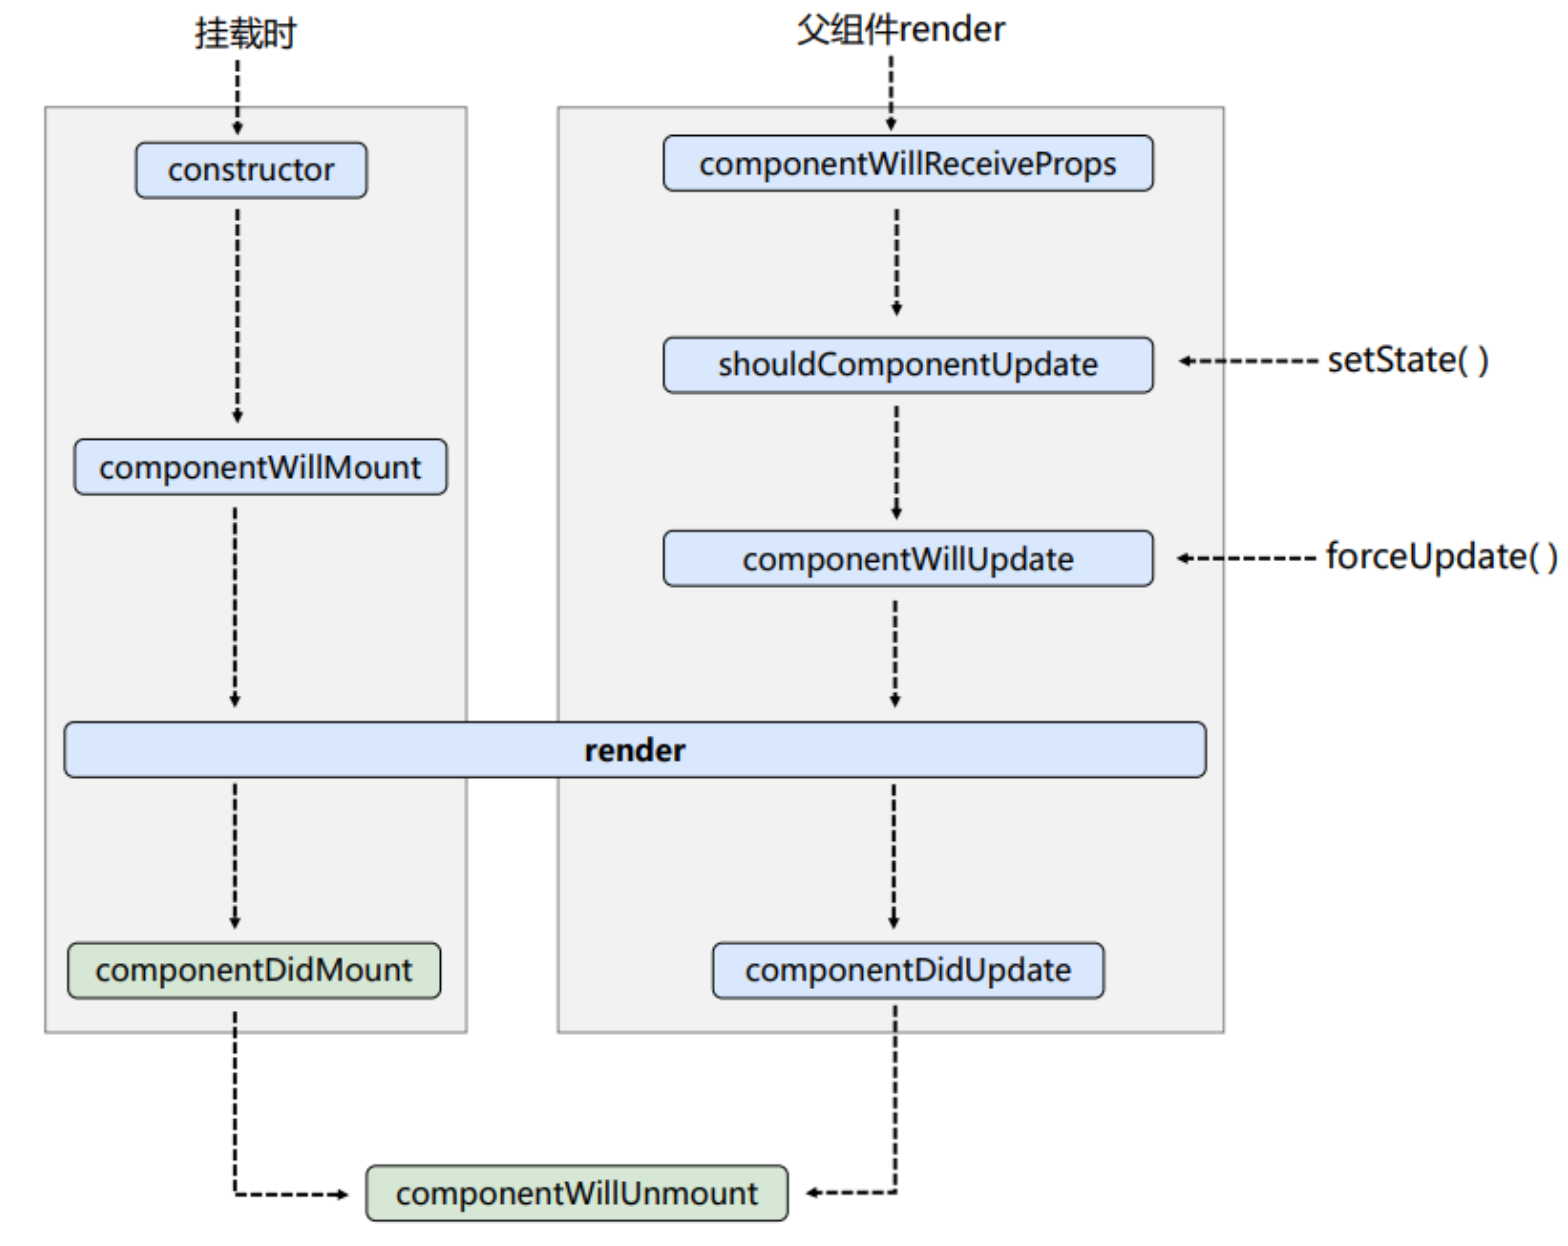
已上图的意思是钩子函数的激活方式和执行顺序:
- 激活方式:
- 挂载时
- 父组件执行 render 钩子时
- 执行 setState 函数时
- 执行 forceUpdate 函数时
- 执行顺序即为箭头走势
注意有一个坑:
componentWillReceiveProps 在第一次父组件渲染时, 不会执行, 第二次渲染才会执行. 也就是说, 第二次渲染并且有props 传入到子组件, 子组件才会调用 componentWillReceiveProps 钩子.
//1.创建组件
class Count extends React.Component {
   //构造器钩子
   constructor(props) {
      console.log(" Count-constructor");
      super(props)
   }
   state = {
      count: 0
   }
   add = () => {
      const { count } = this.state;
      this.setState({ count: count + 1 })
   }
   //不更新 state 的情况下, 强制更新组件
   myForceUpdate = () => {
      this.forceUpdate()
   }
   unMount = () => {

      ReactDOM.unmountComponentAtNode(document.getElementById("test"))
   }
   //组件将要挂载钩子
   componentWillMount() {
      console.log(" Count-componentWillMount");
   }
   //组件将要卸载钩子
   componentWillUnmount() {
      console.log("Count-componentWillUnmount");
   }
   //控制 render 更新的阀门钩子,返回值默认是 true, 如果写了之后, 不写返回 true, setState 之后就不会走下去
   shouldComponentUpdate() {
      console.log(" Count-shouldComponentUpdate");
      return true
   }
   //组件即将更新钩子
   componentWillUpdate() {
      console.log("Count-componentWillUpdate");
   }
   //渲染组件钩子
   render() {
      console.log(" Count-render");
      return (
         <div>
            <h2 >当前求和为 {this.state.count}</h2>
            <button onClick={this.add}>点我+1</button>
            <button onClick={this.unMount}>卸载组件</button>
            <button onClick={this.myForceUpdate}>强制刷新</button>


         </div>

      )
   }
   //组件更新完毕钩子
   componentDidUpdate() {
      console.log("Count-componentDidUpdate");
   }
   //组件刚挂载完毕钩子
   componentDidMount() {
      console.log("Count-componentDidMount");
   }
}
//父组件A
class A extends React.Component {
   state = { brand: "奔驰" }
   changeBrand = () => {
      this.setState({ brand: "宝马" })
   }
   //点击按钮后, 像子组件 B 中传入新的 props, 导致 B 开始执行下面的所有生命周期
   render() {
      return (
         <div>
            <div>我是 A 组件</div>
            <button onClick={this.changeBrand}>换车</button>
            <B brand={this.state.brand}/>
         </div>
      )
   }
}
//子组件B
class B extends React.Component {
   componentWillReceiveProps(){
      console.log("B-componentWillReceiveProps");
   }
   render() {
      return(
         <div>
            <div>我是 B 组件, 我接收到的车标是: {this.props.brand}</div>
         </div>)

   }
}
//2.渲染组件
ReactDOM.render(<Count />, document.getElementById('test'))
ReactDOM.render(<A />, document.getElementById('test'))
旧版本总结
1. 初始化阶段
由 ReactDom.render() 触发 — 初次渲染
- constructor()
- componentWillMount()
- render()
- componentDidMount()
- 非常常用, 可以做一些初始化的事情, 比如开启定时器, 发送网络请求, 订阅消息
2.更新阶段
由内部组件的 this.setState() 或者父组件的重新 render 触发, 重新 render 可由 setState 父组件的重新 render 触发.
- shouldComponentUpdate()
- componentWillUpdate()
- render()
- componentDidUpdate()
3.卸载组件
由 ReactDom.unmountComponentAtNode() 触发
- componentWillUnmount
- 非常常用, 做一些收尾工作: 关闭定时器, 取消消息订阅
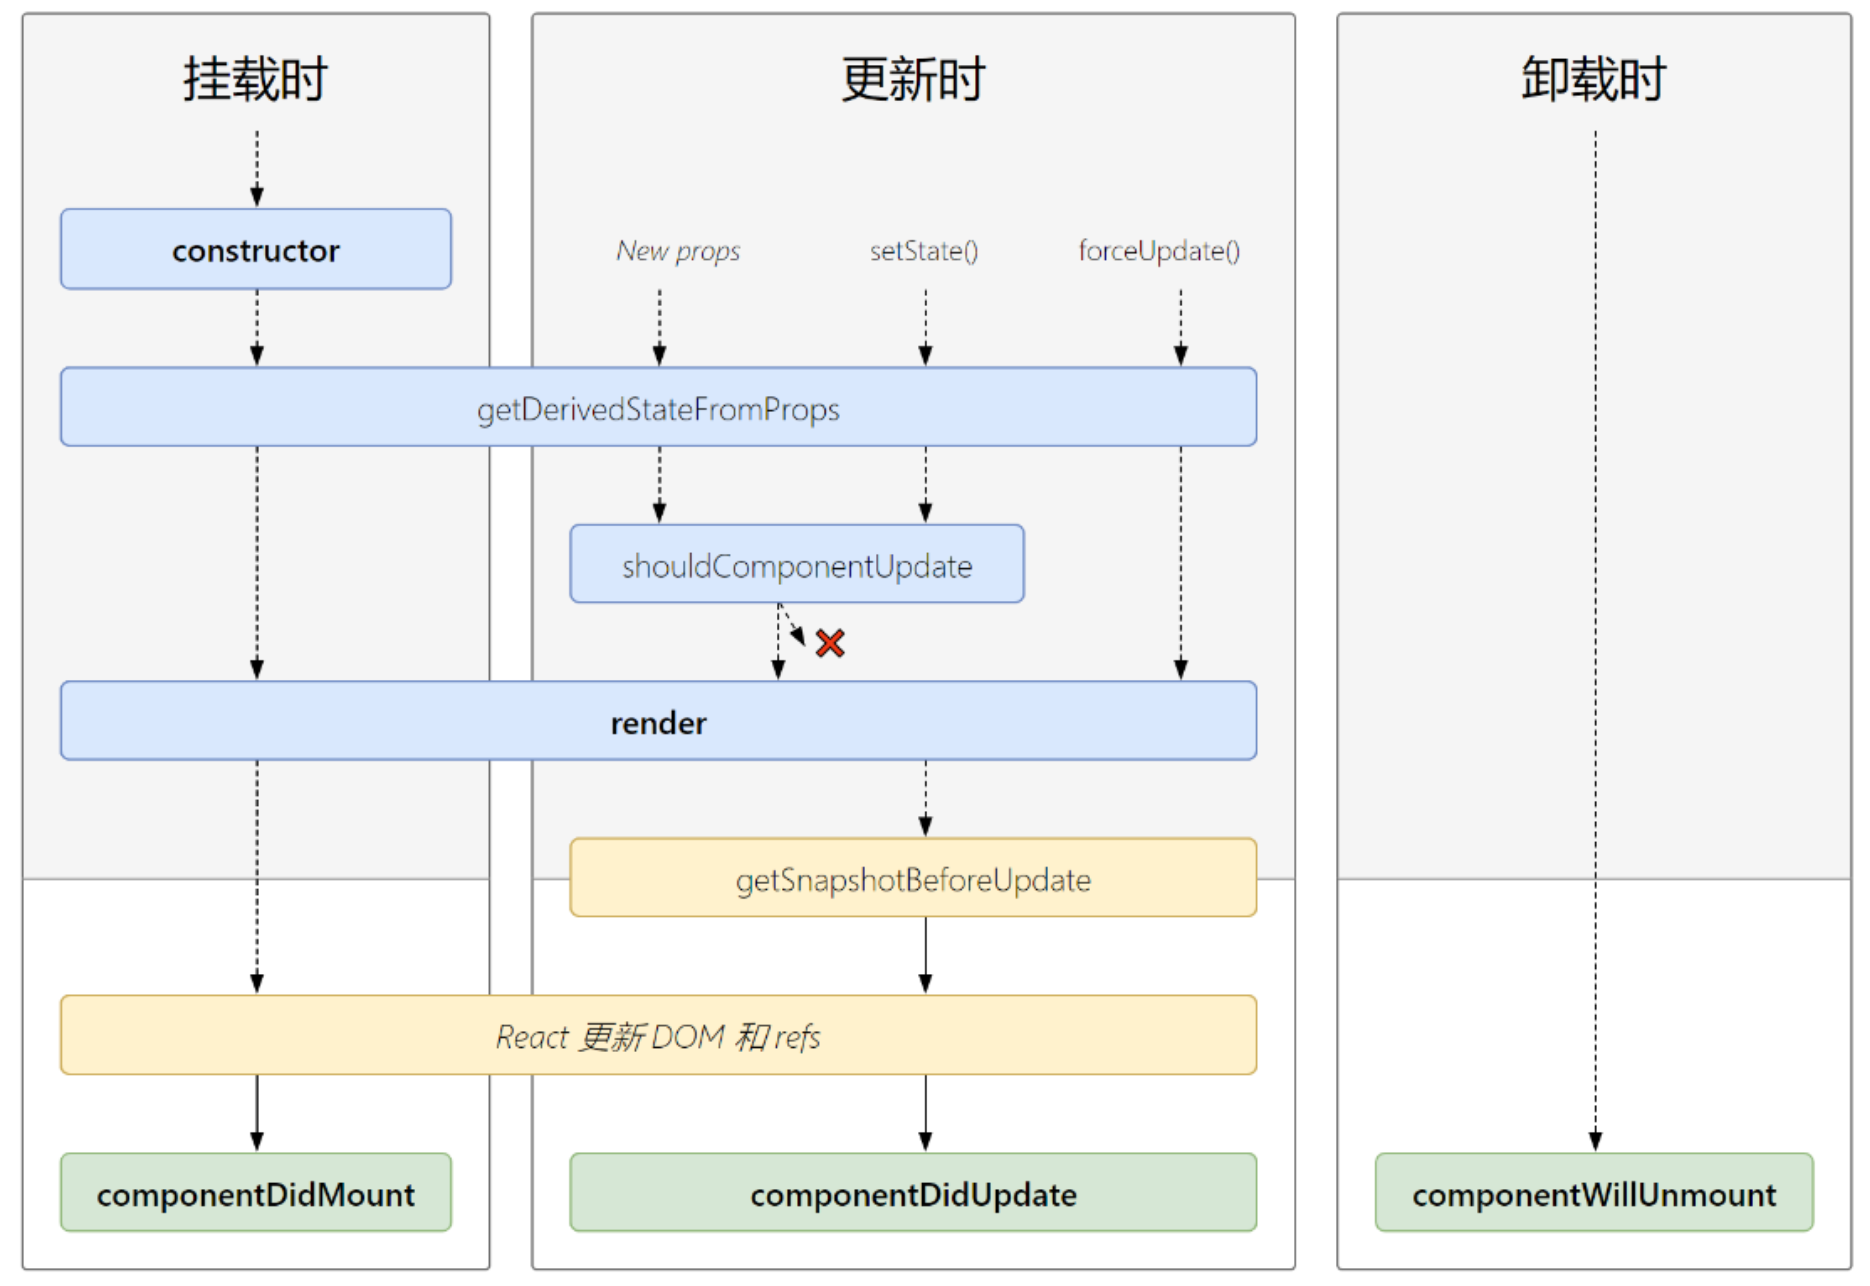
新的声明周期

新的生命周期对比于就得声明周期, 废弃了 3 个钩子(3 个 will):
- componentWillMount
- componentWillReveiveProps
- componentWillUpdate
提出了两个新的钩子(不常用):
- getDerivedStateProps
- getSnapshotBeforeUpdate
最重用的还是最底端的 3 个绿色钩子.
新版本总结
1. 初始化阶段
由 ReactDom.render() 触发 — 初次渲染
- constructor()
- getDerivedStateFromProps()
- render()
- componentDidMount()
- 非常常用, 可以做一些初始化的事情, 比如开启定时器, 发送网络请求, 订阅消息
2.更新阶段
由内部组件的 this.setState() 或者父组件的重新 render 触发, 重新 render 可由 setState 父组件的重新 render 触发.
- getDerivedStateFromProps()
- shouldComponentUpdate()
- render()
- getSnapShotBeforeUpdate()
- componentDidUpdate()
3.卸载组件
由 ReactDom.unmountComponentAtNode() 触发
- componentWillUnmount
- 非常常用, 做一些收尾工作: 关闭定时器, 取消消息订阅
